
Screen Modifier — Visual Layout Editor
Filling in dozens of collections by hand is precise, but slow. The Visual Layout Editor gives you the same power on a drag-and-drop canvas: you see the screen exactly as users will, rearrange it directly, and save the result straight back into a Screen Modifier record.
Opening the editor
There are two ways in:
- From a Screen Modifier record whose Applicable For is Entity Type or EntityType List, run the Open In Editor action.
- From the list view of any type, use Create Screen Modifier to start a fresh modifier, or Open Screen Modifier to jump straight into the editor for that type.
The editor opens the screen for the chosen type (respecting the For Mobile View and For Quick Creator View flags, and the layout name on the record) and shows it on a canvas you can edit.
WARNING
The editor needs a concrete type to draw, so it is only available when Applicable For is Entity Type or EntityType List — not for the broad All Screens, Master Files or Documents scopes.
The layout of the editor
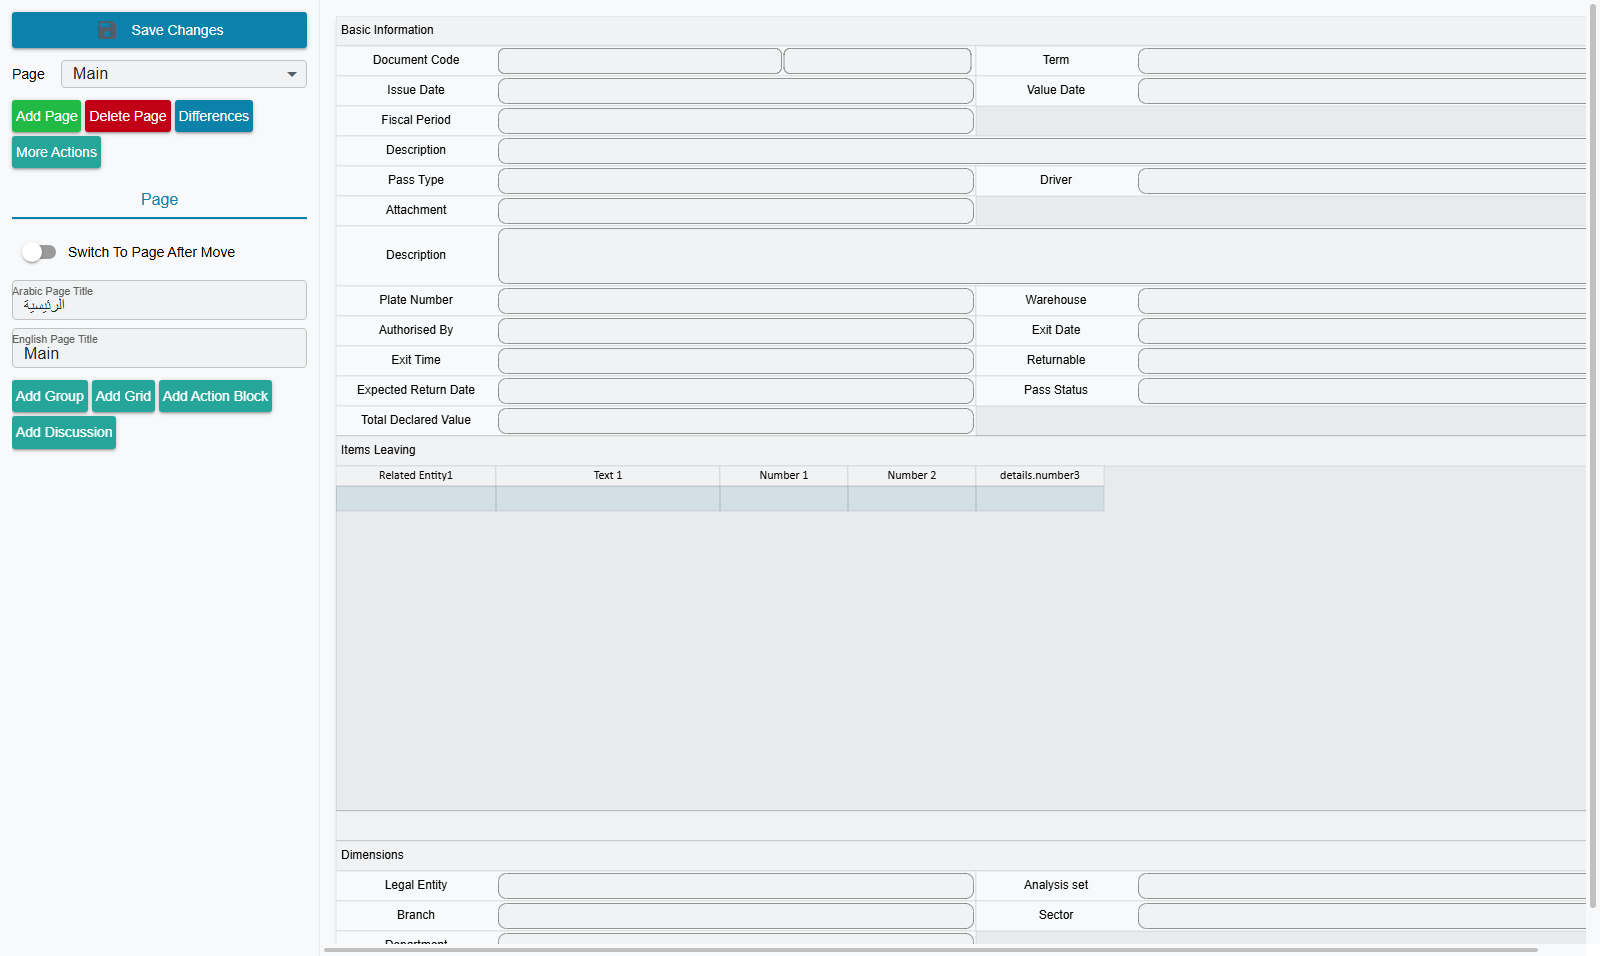
The editor has two parts:
- a wide canvas on the right that renders the live screen, and
- a properties panel on the left where you act on whatever you have selected.
At the top of the panel sit the controls that always apply:
- Save Changes — writes everything you've done back into the Screen Modifier. Nothing is persisted until you press it.
- Page selector — switch between the screen's pages (tabs).
- Add Page / Delete Page — add a new tab or remove the current one.
- Differences — opens a dialog comparing your edited layout against the base layout, so you can see — and selectively accept — exactly what you've changed.
- More Actions — additional layout operations.
Below those, the panel shows Page, Block, Field and Action tabs. Which tabs appear depends on what you've clicked on the canvas: select a field and the Field tab opens; select a button and the Action tab opens, and so on.
Editing a page
The Page tab acts on the current tab:
- Set its Arabic Page Title and English Page Title.
- Add building blocks to it: Add Group, Add Grid, Add Action Block, or Add Discussion.
- The Switch To Page After Move toggle controls whether, when you move a block to another page, the editor follows it to that page.
Editing a block
Click any group, grid, actions block or discussion area to select it. The Block tab then lets you:
- rename it with an Arabic Block Title / English Block Title,
- for a grid, choose its Grid Size (from Tiny up to XXLarge),
- Modify Fields (for a group), Modify Grid Fields (for a grid) or Modify Actions (for an actions block) — each opens a two-column picker where you choose which fields/columns/actions appear and in what order,
- Add Composite — add a composite (formula) field to a group,
- Delete Block — remove the block from the screen,
- Copy To Page / Move To Page — duplicate or relocate the block onto another tab.
Editing a field
Select a single field to open the Field tab:
Field Id is shown read-only so you know exactly which field you're on.
Give it an Arabic Field Title / English Field Title to override its label.
Show In Grid View (for grid columns) toggles whether the column appears in the grid.
Field Layout (for header fields) controls how the field sits on the form:
Layout Effect Normal Standard placement, flowing with the other fields. Alone The field sits on its own line. Start New Line The field begins a new row. Spanned The field stretches across more width. Spanned 2 The field stretches across an even wider span. Edit Composite Props appears for composite fields, letting you adjust how the combined field is built.
Delete Field removes the field from the screen.
Editing an action
Select a button to open the Action tab, where you can see its GUI Action Id, override its Arabic Action Title / English Action Title, or Delete Action to remove it from the screen.
Saving and applying
Pressing Save Changes stores your design in the Screen Modifier.
The editor saves one XML field, not the grids
This is worth knowing before it surprises you. Filling the modifier in by hand spreads the change across its collections — Removed Fields, Modified Grids, Added Groups and the rest. The editor does not touch any of them: it writes the whole redesigned screen as a single block of XML into the Wizard Edit Screen XML field on the modifier's main tab.
So a Screen Modifier built in the editor opens with every one of its grids empty, and that is normal — the modification really is live, and the design is in that one field. Read it as "this record was designed in the editor", not as "this record is empty".
It also works the other way round: while that field holds a value, the record refuses manual changes to the collections. Saving one is rejected with a message telling you to clear Wizard Edit Screen XML first — which discards the whole design made in the editor. Decide early which way you want to maintain a given modifier, by hand or in the editor, because moving from the editor back to hand-editing means starting that record again.
As with any modifier, the change does not reach users until the screens are rebuilt — run Regenerate GUI For Applicable Types Only (or Regenerate Screens) and reopen the screen to confirm. See Overview & Concepts for the full rebuild rhythm.
Automatic additions are suppressed once you design a screen here
When a screen is built through the visual editor, Nama treats your design as complete and stops layering its own automatic additions on top of it — things like the "related documents" links grid or other module-specific blocks it would normally inject. If a screen loses one of those pieces after you redesign it, turn on Allow System Modifiers on the Screen Modifier's main tab (see Priority and Activation) to keep them.
See also
- Edit-Screen Modifications — the same building blocks, described as the collections you fill in when you build a modifier by hand instead.
- Overview & Concepts — applicability, Modify vs. Copy, and regenerating screens.