
Nama ERP Installation Guide
Nama ERP is a Java-based web application that runs on Apache Tomcat and uses Microsoft SQL Server as its default database engine.
System Requirements
- Operating System: 64-bit (Windows Server recommended)
- Java JDK: Version 21 or higher Download JDK 21
- Apache Tomcat: Version 10 Download Tomcat 10
- Database Engine: Microsoft SQL Server 2016 or higher (SQL Server 2022 recommended) For test environments, use SQL Server Developer EditionDownload SQL Server
- SQL Server Management StudioDownload SQL Server Management Studio
- 7-Zip (for handling compressed files) Download 7-Zip
- Notepad++ (for viewing logs or editing configuration files) Download Notepad++
- Nama ERP InstallerDownload Installer
Database Setup
- Enable Mixed Mode Authentication in SQL Server.
- Create a database (avoid using the default name
namaerpin production). - Create a SQL user (or use
sa) and grant full access to the database. - Enable TCP/IP Protocol using SQL Server Configuration Manager.
- For named instances, assign a static port using the IPAll settings.
If you are installing SQL Server on a modern SSD drive, you might face an issue after the installation
Sample Log content (Log is usually in C:\Program Files\Microsoft SQL Server\MSSQL16.MSSQLSERVER\MSSQL\Log\ERRORLOG )
Error: 5179, Severity: 16, State: 1.
Cannot use file 'data file path', because it is on a volume with sector size 8192. SQL Server supports a maximum sector size of 4096 bytes. Move the file to a volume with a compatible sector size.
- Solution:
- Unistall SQL Server
- Run the following powershell script:
New-ItemProperty -Path "HKLM:\SYSTEM\CurrentControlSet\Services\stornvme\Parameters\Device" -Name "ForcedPhysicalSectorSizeInBytes" -PropertyType MultiString -Force -Value "* 4095"
3. Restart Windows
3. Install SQL Server again
Using the Installer
The Nama ERP Installer provides a graphical interface with the following key features:
Core Installation Features
- Creating database and database users
- Generating SQL Server Agent full backup job
- Creating differential backup job (runs every 2–3 hours)
- Generating backup cleanup script (removes old backups)
- Option to upload backups to cloud storage (Google Drive, Dropbox, OneDrive, etc.)
- Automatic SSL certificate creation using Let's Encrypt
Interface Sections
- License Information: License key, customer name, sub-server (auto-populated)
- Database Configuration: Server, port (1433), database name, credentials
- Server Configuration: Tomcat path (auto-detected), server address
- Installation Paths: Extras.zip URL/path, download destination
- Progress Monitoring: Real-time status, logs, and progress bars
Smart Features
- Auto-detection: Common Tomcat paths, existing configurations
- Real-time validation: Visual feedback (green/red borders) for field inputs
- Configuration persistence: Auto-save/restore settings via
installer.properties - License key integration: Automatic customer/sub-server population
SSL Certificate Requirements
To install SSL with Let's Encrypt, you need:
- A static IP address
- A domain name that points to the static IP
- Port forwarding for ports
80and443from your router to your server
Tips
If a static IP is not available, you can use a Dynamic DNS service (e.g., selfip, DDNS).
Supported Databases
While SQL Server is the default, other databases may be supported. Please contact Nama ERP technical support for confirmation before using alternatives.
📺 Full Installation Walkthrough
Watch the full installation tutorial here: 👉 https://youtu.be/6UWe9GyZC20
Confirming Nama ERP Installation
By default, Apache Tomcat runs on port 8080. If you did not change the port during setup, you can confirm that Nama ERP is installed correctly by visiting:
http://localhost:8080/erp/
If the login page appears, the installation was successful.
To allow access for other users on your local network (LAN), make sure port 8080 is open in Windows Firewall:
- Go to Windows Defender Firewall > Advanced Settings
- Under Inbound Rules, create a new rule to allow traffic on port
8080
Here's the refined version with clearer formatting and corrections:
Upgrading Nama ERP
You can upgrade Nama ERP from the utils page within the system interface. Multiple upgrade methods are available depending on your setup.
Manual Upgrade
To upgrade Nama ERP manually:
Download the upgrade tool: https://namasoft.com/bin/upg-wget.jar
Copy the file into your Tomcat installation folder
You can run the JAR file by:
Double-clicking it OR
Using Windows Command Prompt:
Steps:
Open Command Prompt (
cmd)Navigate to your Tomcat installation folder using the
cdcommand, for example:cd "C:\Program Files\Apache Software Foundation\Tomcat 10"Run the upgrade tool:
java -jar upg-wget.jar
This tool will automatically download and apply the latest Nama ERP updates.
How to Allow Downloading Releases from Utils Page?
To enable the system to download and install updates from the utils page (i.e., support self-upgrade functionality), the Tomcat service must run under the Local System Account.
Tips
This configuration is typically set automatically during the Nama ERP installation. If auto-upgrade stops functioning, follow these steps to restore it
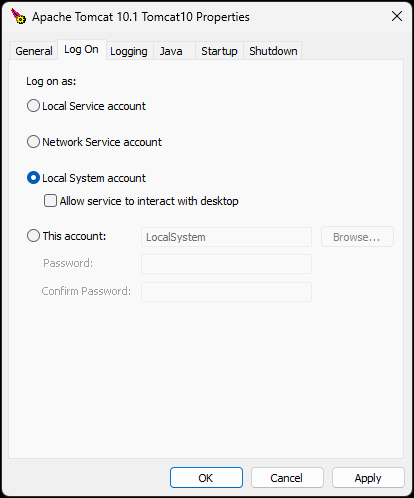
Open the Tomcat Service Configuration Utility:
- Navigate to:
C:\Program Files\Apache Software Foundation\Tomcat 10\bin\tomcatw.exe - Or search in the Windows Start Menu for: Configure Tomcat
- Navigate to:
In the configuration window, go to the Log On tab.
Select the radio option Local System account.
Save the configuration and restart the Tomcat service.
Troubleshooting
Common Issues & Solutions
Pre-Installation Validation: Use Perform Checks (F5) to diagnose problems:
- Port Conflicts: Another program using Tomcat's port (usually 8080)
- Database Problems: SQL Server not running, TCP/IP disabled, or incorrect credentials
- Java Issues: Missing or incorrectly configured Java path
- Invalid Paths: Non-existent Tomcat directory or malformed URLs
Debugging Installer Commands
Viewing Detailed Installer Output
To see detailed output from commands that run within the installer (useful for debugging installation issues), you can enable process output printing by modifying the installer launcher script.
Edit the install-nama-erp.js file and replace:
Arguments = " -jar \""+oFolder.path+"\\nama-installer-0.0.1-SNAPSHOT.jar\"";
With:
Arguments = " -Dprint-process-output=true -jar \""+oFolder.path+"\\nama-installer-0.0.1-SNAPSHOT.jar\"";
This will display the output of all commands executed by the installer, helping you identify the exact point where an installation issue occurs.
Error Resolution Process
- Run Diagnostics → Review Logs → Fix Fatal Errors → Retry Installation
- Use Load From Tomcat to import existing configurations
- Save Config preserves settings between sessions for troubleshooting
Installer Controls & Operations
Main Action Buttons
- Start Installation: Begins installation after validation (Enter key or green button)
- Perform Checks (F5): Validates Tomcat, database, Java, and port configuration
- Save Config (Ctrl+S): Saves settings to
installer.properties - Load From Tomcat (Ctrl+L): Imports configuration from existing installation
Advanced Operations
- Request Key: Automated license key request from Nama servers with approval monitoring
- Install SSL: Launches Let's Encrypt certificate installation wizard
- Migrate Tomcat: Upgrades from Tomcat 9 to Tomcat 10 with configuration preservation
- DB Scripts: Generates database setup scripts
Validation & Auto-Detection
- Path Detection: Automatically finds Tomcat in common locations
- Field Validation: Real-time feedback with colored borders (green=valid, red=invalid)
- Configuration Import: Loads existing settings from
nama.properties - Progress Monitoring: Real-time download progress, installation status, and detailed logging