
Loading an Archive from a ZIP File
Registering documents one at a time is fine for the trickle of new paperwork. It is hopeless for the thousand scanned files a customer hands you at the start of an implementation.
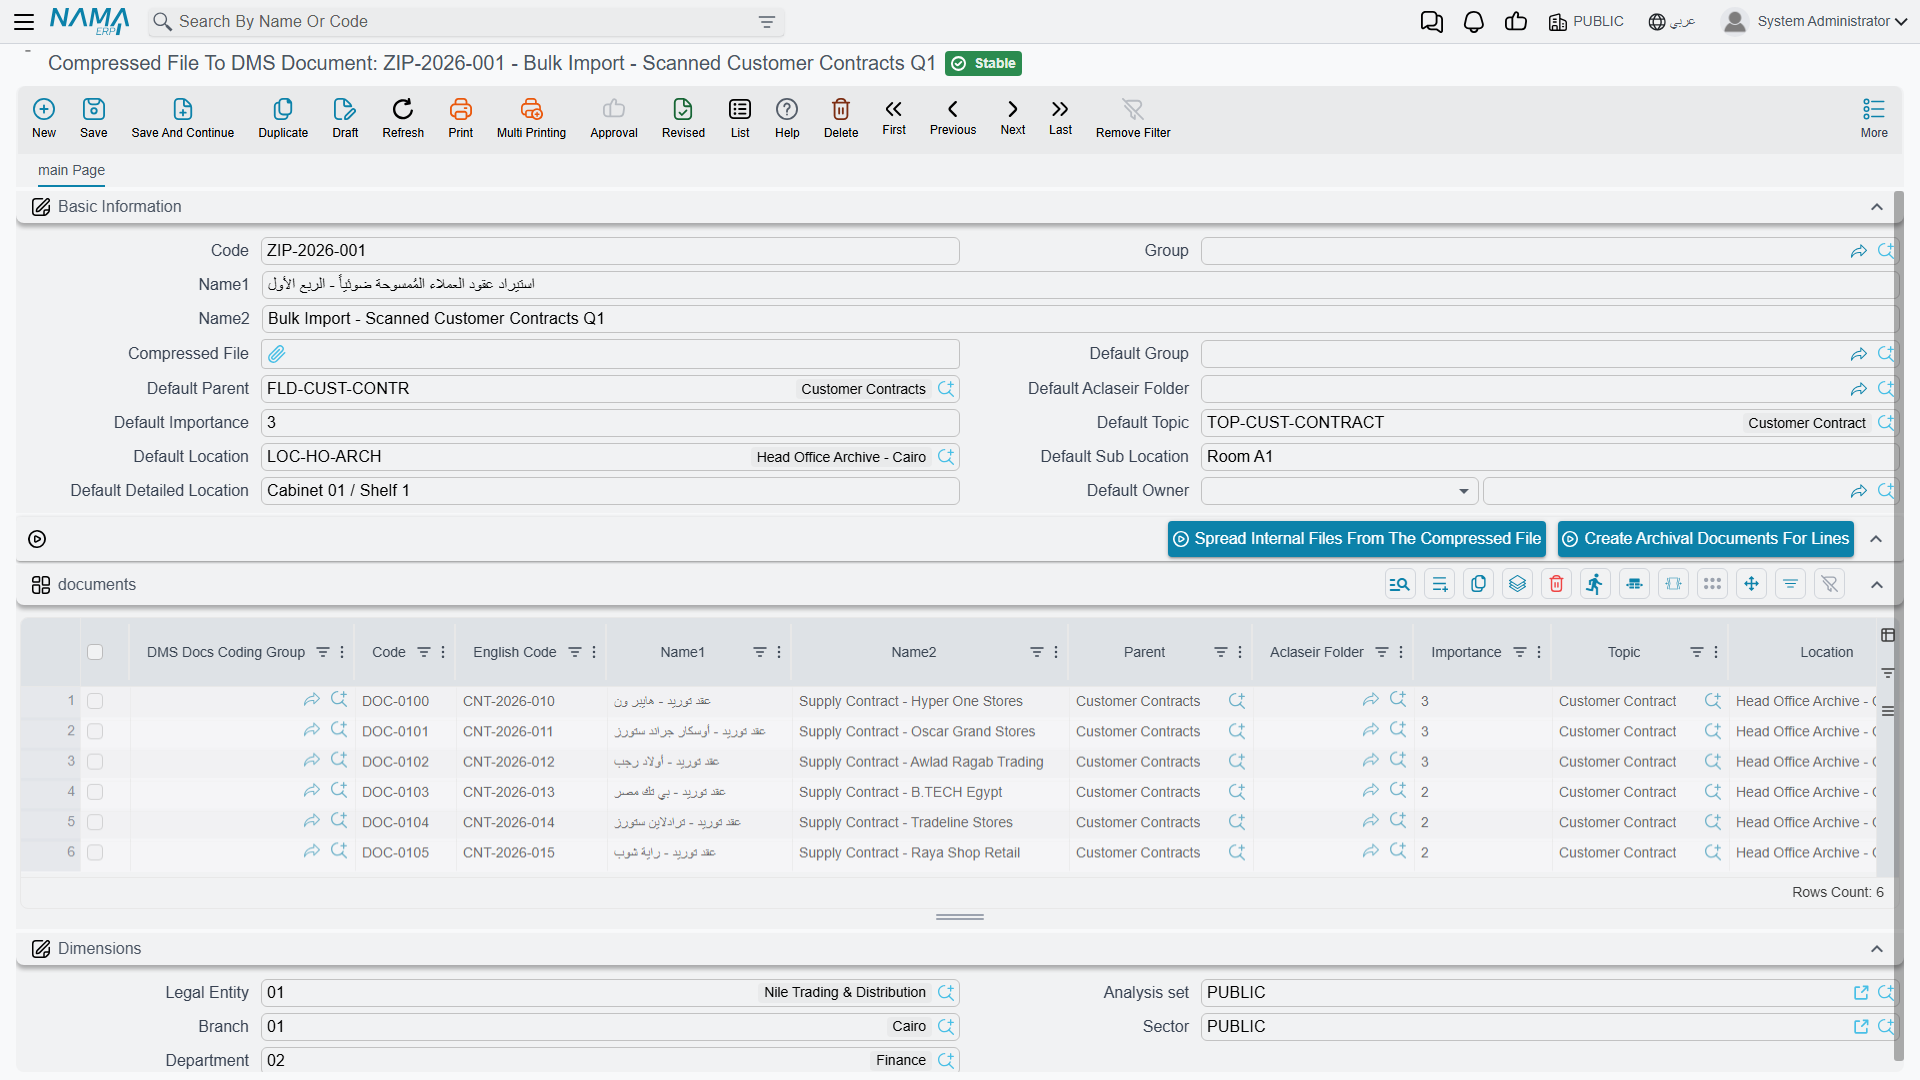
Compressed File To DMS Document / ملف مضغوط إلى مستندات أرشيفية exists for that first load. You upload one ZIP archive, the system unpacks it into a staging grid — one row per file inside — you complete the coding, and a second button turns every row into a real archived document with the file already attached.
The Two-Step Workflow
The screen has exactly two buttons and they run in order.
Step 1 — Spread Internal Files From The Compressed File
فرد الملفات الداخليه من الملف المضغوط
Attach your ZIP in Compressed File / الملف المضغوط, save, then press this button. The system walks the archive and creates one row in the grid per file, skipping folder entries. Each row arrives with the file already attached in its Current Version.
It clears the grid first
Pressing this button again wipes every row and starts over, discarding any coding you had typed. Do the unpacking once, then do the typing.
Two quirks in what you get back:
- Name1 is set to the full path inside the archive, not the file name. A file stored as
contracts/2026/acme.pdfproduces a row named exactly that. Plan to overwrite it. - Code is left empty, so every created document relies on auto-coding unless you type codes yourself.
Step 2 — Create Archival Documents For Lines
إنشاء المستندات الأرشيفية للسطور
Once the grid is filled in, save and press this button. For each row the system creates a DMS Document, attaches the file to it, and writes the new document back into the row's Created Document column so you can see what came out.
The step is safe to repeat: a row that already produced a document edits that same document rather than creating a duplicate.
A failed row stops the run
If one row fails, the process stops there. Rows before it are already created; rows after it are untouched, and the message does not identify which row was at fault. Fix the problem and press the button again — the rows that already worked will not be duplicated.
What Actually Transfers — and What Does Not
This is the part to read twice, because the screen offers far more than it delivers.
Only these columns reach the created document:
| Column | Arabic label |
|---|---|
| Code | الكود |
| Name1 / Name2 | الاسم العربي / الاسم الإنجليزي |
| Importance | الأهميه |
| Sub Location | الموقع الفرعي |
| Detailed Location | الموقع التفصيلي |
| Renewal Date | تاريخ التجديد |
| Expiration Date | تاريخ الانتهاء |
| Current Version (the file) | النسخة الحالية |
Folder, topic, owner and archive are silently discarded
The grid also offers DMS Docs Coding Group, English Code, Parent (the folder), Aclaseir Folder, Topic, Location (the archive) and Document Owner as editable columns — and none of them is copied to the created document. Nothing warns you. You get documents filed in no folder, classified under no topic and owned by nobody.
Worse, the whole block of default values in the header — Default Group, Default Parent, Default Aclaseir Folder, Default Importance, Default Topic, Default Location, Default Sub Location, Default Detailed Location and Default Owner — is read by nothing at all. Filling it in changes nothing anywhere.
Do not spend time coding those columns. Plan to set the filing after import instead.
A Workflow That Works Today
Given the above, the reliable way to load an archive in bulk is to let the ZIP importer do what it genuinely does — create documents with their files attached — and to do the filing in a second pass:
- Group your files by destination before you zip them. One ZIP per folder-and-topic combination: all the employment contracts in one, all the licences in another. This is what makes the second pass a bulk operation instead of a per-document one.
- Unpack and create with the two buttons, filling in only the columns that transfer — names, importance, positions and dates.
- Set the filing in bulk afterwards. Export the newly created documents to a spreadsheet, fill in Folder, Topic, Location and Owner down the column, and import it back. See Importing Records.
Or skip this screen entirely
If your scans are already named after something the system knows — an employee code, a contract number — a straight record import of DMS Documents gives you complete control over every field in one pass, with no second step and no discarded columns. The ZIP screen is most useful when the files are all you have and their names mean nothing.
Practical Limits
- Keep the archives modest. Each file is held in memory while it is unpacked, so a very large ZIP can exhaust the server. Split a big load into batches of a few hundred megabytes rather than uploading one enormous archive.
- There is no extension filter and no duplicate check. Whatever is in the ZIP becomes a document, including stray thumbnail and system files. Clean the archive before you upload it.
- Individual file size is bounded by the usual upload limit of 20 MB per file.
- Deleting the import record does not delete the files it holds. The ZIP and every extracted copy stay in storage. Where attachments are stored outside the database, they remain on disk — worth knowing before you use this screen repeatedly for trial runs.