
The Booking Calendar
Required licence
crm-technician-appointments.
Technician Appointment Creator (إنشاء موعد فني) is the screen booking staff spend their day in. It is a week view of your crews' bookings, with three fields and a filter bar on top, and it has two jobs:
- Book a new visit. Pick the section, the job and the document the visit was sold on, drag out the hours and press Save.
- Rearrange visits that are already booked. Drag them to a new time, or right-click them to cancel one, close it or record a no-show.
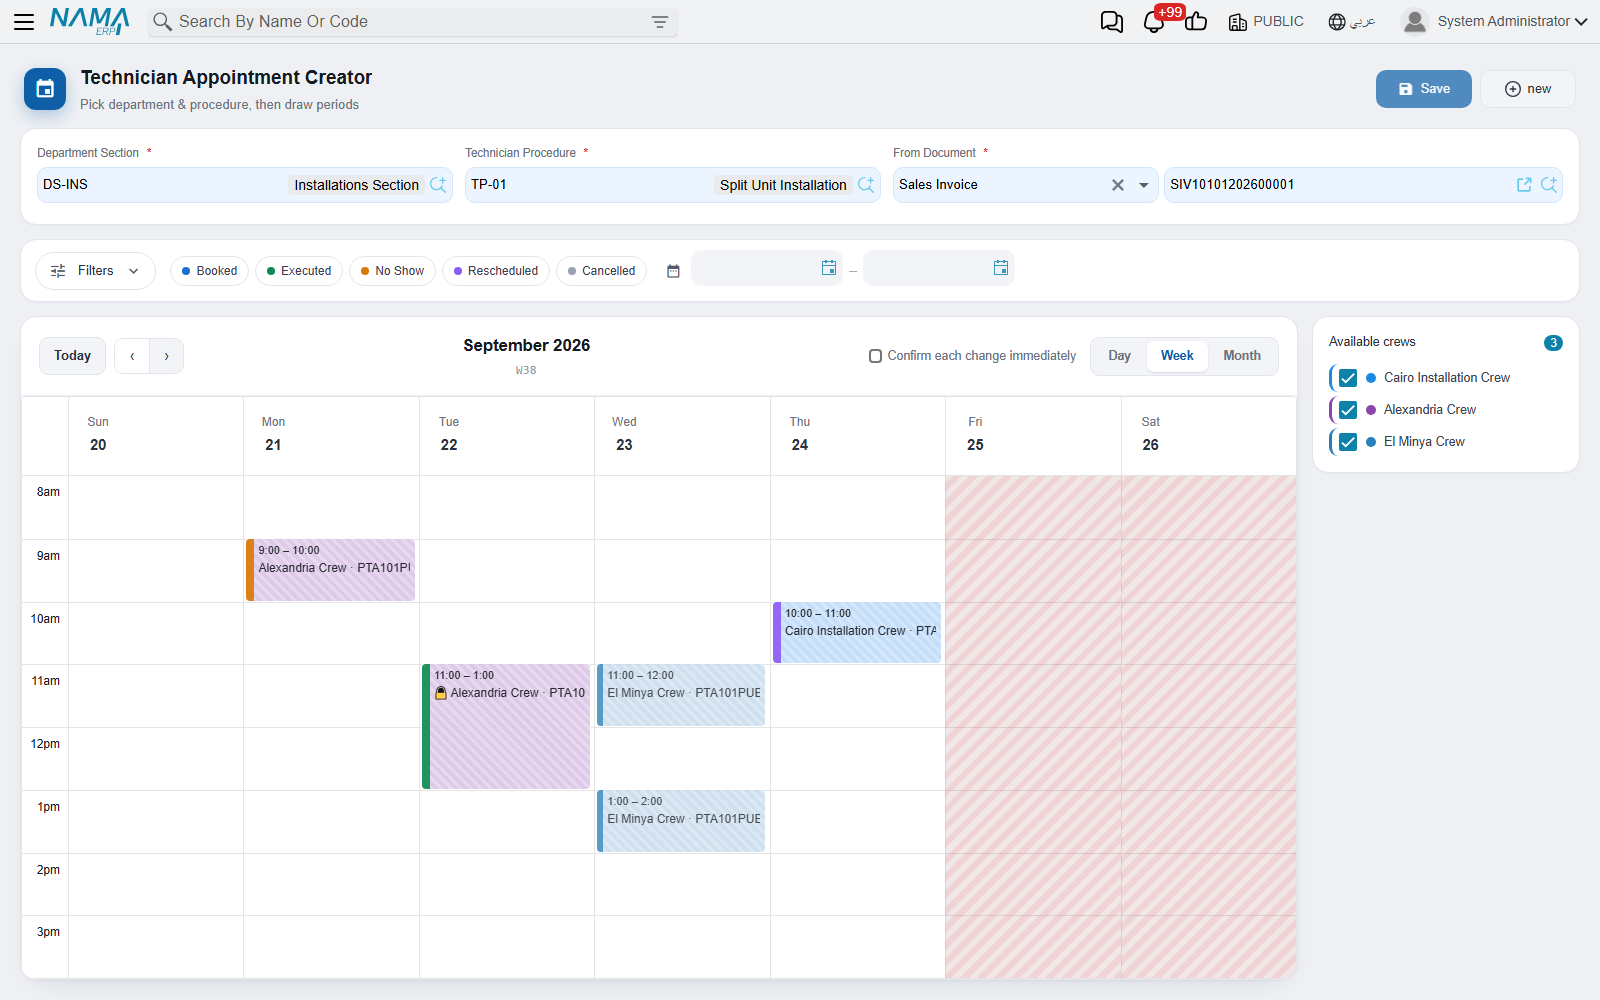
The three fields at the top
Department Section (القسم الوظيفي) — only sections marked Show In Appointments Screen are offered. Choosing one loads that section's booking settings. They set the grid's working hours, its slot height and the range of weeks you can page through.
Technician Procedure (إجراء فني) — the job. The picker offers the procedures whose Department Sections grid names the section you chose, plus the procedures whose grid is empty.
From Document (بناءا على) — the document that promised the visit, such as a sales invoice, order or contract. Any document type is accepted. You must pick it before you can draw: if you try to draw without it, the calendar tells you to "Pick the source document (from doc)".
Until both the section and the procedure are set, the calendar stays behind a "Pick department & procedure to start drawing periods" panel. Once both are set, the crew list and the week fill in. If you change the section or the procedure later, any periods you have drawn and not saved are discarded without a warning.
The New button next to Save clears the three fields and the periods you have drawn, ready for the next customer. It keeps your pending changes to existing bookings and your filters. You can also open the screen with the fields already filled in, from a link or a button. See Opening the calendar from a link or a button.
Reading the week
The Available crews panel on the side lists the committed crews that can do this job in this section. A crew is listed when its Procedures grid names the chosen procedure or is empty, and its Department Section matches or is empty. Each crew has its colour (the crew's Color Code, or an automatic colour when that is blank) and a tick box. Click a crew's row to tick or untick it. An unticked crew's bookings leave the view, and the crew is no longer offered when you draw a period. On a crowded week this is the fastest way to answer "when is the Cairo crew free": untick all the other crews.
Existing appointments are drawn hatched, in their crew's colour. Each is labelled with the crew and the appointment code, followed by the appointment's title when a title descriptor is set up for Technician Appointment (see Descriptors). A coloured strip on the leading edge shows a status other than Booked. Existing appointments are not frozen: you can move them and change their status, as described in Changing a booking on the calendar. There are two exceptions:
- An Executed appointment carries a padlock and cannot be moved or changed.
- A Cancelled appointment is not drawn at all, so its time shows as free.
An appointment you have changed but not saved gets a dashed outline. A period you have marked for deletion is shown faded and struck through.
Blocks without an appointment code are the periods you have just drawn and not saved yet.
Shaded time cannot be booked: days the shift marks as rest, hours outside the shift's work periods, and everything before the current moment. The past is greyed out so that nobody books a visit whose time has already gone, and a line marks the current time.
The filter bar above the calendar narrows which existing appointments are drawn. It is the same bar as on My Appointments, described in Filtering the schedule, with a shorter field list: Customer, Branch, Area, From Document and Technician Appointment. The status chips work as there, but the Cancelled chip always shows nothing here, because cancelled appointments are never drawn on this screen.
Hidden is not free
A booking that is filtered out still occupies its crew's time. You cannot move another period of that crew onto it.
The toolbar has Today, the ‹ › arrows to page back and forward, the period title with the week number underneath, and the Day / Week / Month views. The Confirm each change immediately tick box is explained under Saving your changes.
Drawing a booking
- Drag down the column for the day you want, from the start time to the end time. The drag snaps to the slot length set in booking settings, which is one hour in the screenshot.
- A dialog asks you to Choose the crew for this period, with a search box for sites that have many crews. It lists only the ticked crews. When exactly one crew is ticked, it is chosen for you without asking. When no crew is ticked, the calendar tells you to "Pick Crew".
- The block appears in that crew's colour. Until you save, you can drag it to another time or drag its edge to resize it. Repeat for as many periods as the job needs, for example a morning block and an afternoon block, or three mornings in a row.
- Press Save.
All the periods you draw belong to one crew
If you choose a different crew for a second period, the calendar tells you "Crew changed — previous periods removed" and clears what you had drawn. Only the new period is left.
This is deliberate: an appointment books exactly one crew, so one booking can only be for one crew. Book the second crew as a second appointment.
To get rid of a period you drew, click it and answer Delete this period?. Right-clicking a drawn period opens a menu headed by the crew's name, with two actions:
- Save this period books an appointment from that one period straight away and leaves the rest of your drawing on screen.
- Delete this period removes it.
What Save does with new periods
Save is enabled once you have a section, a procedure, a source document and at least one drawn period. It builds the appointment and commits it in one step:
- Department Section, Technician Procedure and From Document go on the header. On save, the system also fills in Based On Document, Customer and the Customer Address page.
- Each drawn block becomes a detail row with the crew, day, start time and end time.
- The status starts at Booked. The book, term and number come from the section's booking settings, and the dimensions come from that book.
The calendar does not fill in the Items And Services grid. If the visit needs its materials listed, open the appointment afterwards and fill the grid there. See The Technician Appointment.
A confirmation shows Appointment created with the new code, and the drawn blocks become an existing appointment like the others. You stay on the same week with the same section and procedure, ready to book the next customer.
If the appointment cannot be committed, the errors are shown and nothing is created. Typical causes are a missing book, an approval rule, a required dimension, or a period that starts before the current time. Your drawn periods stay on screen so you can fix the cause and press Save again.
Changing a booking on the calendar
Plans change after a visit is booked: the customer asks for the afternoon instead, a crew overruns, or a visit turns out not to be needed. Make those changes here, where you can see the whole week, instead of opening each document.
To move a period, drag it to another time or day. To make it longer or shorter, drag its bottom edge. Some moves are refused as you make them:
- A move that overlaps another period of the same crew is refused with "This period overlaps another period of the same crew".
- A drop into the past, outside working hours or on a rest day is refused without a message.
- An executed appointment cannot be moved. Clicking it shows "An executed appointment cannot be changed".
Right-click an existing appointment for everything else. The menu is headed by the appointment code. Right-clicking an empty slot opens no calendar menu.
| Action | What it does |
|---|---|
| Cancel appointment | Sets the appointment to Cancelled. Once saved, it disappears from the calendar |
| Mark as no-show | Sets the appointment to No Show |
| Mark as executed | Sets the appointment to Executed, which locks it |
| Delete this period | Marks just this period for removal from the appointment |
| Undo period deletion | Replaces Delete this period once the period is marked, and brings it back |
| Add a reason | Asks for the Reason for the change |
| Remove from pending changes | Shown only when the appointment has unsaved changes. Drops every unsaved change you made to this appointment |
| Open the record | Opens the appointment document in a new tab |
The three status actions act on the whole appointment, not on the period you clicked, because an appointment has one status. A locked (executed) appointment offers only Open the record, plus Remove from pending changes if it has unsaved changes.
While the menu or the reason box is open, a click on the calendar only closes it. It does not also start a drag or open a dialog.
An appointment keeps at least one period
You can mark every period of an appointment for deletion, but the save is refused with "An appointment cannot lose all of its periods — cancel it instead", followed by the appointment code. The appointment stays in your pending changes. The message gives the right advice: use Cancel appointment.
Moving a period makes the appointment Rescheduled
When a save moves or deletes a period of an existing appointment, the appointment ends up Rescheduled. This happens even if you picked a different status from the menu for the same appointment in the same batch. If you need both, save the move first and then set the status. The appointment document applies the same rule when its periods are changed on its own screen, so the status is the same whichever way the change was made.
The reason for a change
Add a reason opens a small box with the hint "Optional, saved to the change history". The reason is saved with the periods you moved and shows up as the Remark on those rows of the appointment's Change History. A week later, "why did the Giza visit go to Thursday" has an answer. Type the reason before the change is saved.
A few details:
- One reason covers every period of that appointment you moved in the same save.
- A reason typed only for a status change is not stored.
- A period keeps its last reason. If you move it again later without typing a new one, the history repeats the old reason. When a period is deleted, its history row shows the last reason it was given.
- No reason can be recorded while Confirm each change immediately is on, because each move is saved before you get the chance to add one.
Saving your changes
By default, changes wait for you. As soon as you change something, a bar appears above the calendar with:
- a count of the appointments and periods you changed,
- the hint "Use Save changes at the top to apply them",
- a Discard button that throws them all away.
The Save button now reads Save changes, with a badge counting the appointments involved.
Pressing Save changes saves every changed appointment one by one. Then, if you have also drawn new periods, it creates the new appointment. The message tells you how many appointments were updated.
The system can refuse an appointment, for example because a moved period now clashes with an approval rule. That appointment stays pending and is reported as could not be saved and is still pending, with the errors, so you can fix it and save again. Before saving, the system may also need you to confirm something. Each such question appears as a Yes/No dialog titled Confirm Before Starting, and the save is sent again with your answers.
If you want each change to take effect immediately, tick Confirm each change immediately. Every move or status change is then saved as soon as you make it, and there is nothing to discard. Keep in mind:
- The setting is remembered in this browser for the next time you open the calendar.
- If an immediate save fails, the errors are shown and the period goes back to where it was.
- Ticking the box does not save changes that are already waiting, and it hides the bar with the Discard button. Save them with Save changes, or untick the box to get Discard back.
Opening the calendar from a link or a button
A notification, email or SMS can carry a link that opens this calendar with the section, the procedure and the From Document already filled in. A typical use is right after a sale: when a sales invoice for an installation is committed, the booking team gets a message with a link that opens the calendar on that invoice, and all they have left to do is draw the periods.
The Tempo function createappointment builds the link. For a notification template on the sales invoice:
Invoice {code} for {customer.name1} needs an installation visit.
<a href="{createappointment(technicianProcedure="01",departmentSection="01",fromDocType=entityType,fromDocCodeOrId=id)}">Book it now</a>
entityType and id are the current record's type and id, so the same template works on any document. A fixed type such as fromDocType="SalesInvoice" works too. The link it renders has this shape:
<your Nama address>#/tech-appointment?menu=technicianAppointmentCreator&fromDocType=SalesInvoice&fromDocCodeOrId=<invoice id>&technicianProcedure=01&departmentSection=01| Parameter | What it fills in |
|---|---|
departmentSection | Department Section, by its code or id |
technicianProcedure | Technician Procedure, by its code or id |
fromDocType + fromDocCodeOrId | From Document: the document type, plus that document's code or id. The document is used only when both are passed |
The function produces a bare address, so put it inside an href or a button. Parameter names are not case-sensitive, and every parameter is optional: leave out the ones the booking clerk should choose. When the calendar opens, it looks up each value and fills in the field. If it cannot find a value, it leaves the field empty. The parameters are then removed from the address bar, so refreshing the page does not refill fields you have changed since.
The full reference is in the Tempo guide, under Link to Book a Technician Appointment.
A button on the document
The same link can be a button on the sales invoice itself. In a Screen Modifier for the invoice screen, add a row to Action Authorities (صلاحيات الإجراءات) and put this in URL Template (قالب الوصلة):
{OpenInNewWindow}{createappointment(technicianProcedure="01",departmentSection="01",fromDocType=entityType,fromDocCodeOrId=id)}Then tick where the button should appear: Show Button In Edit Screen, Show In Edit Screen Toolbar or Show In More Menu For Edit Screen. Clicking it opens the calendar in a new tab, already set up for that invoice.
Where the calendar's limits come from
None of the working week is configured on this screen. Each limit comes from somewhere else:
| What you see | Where it comes from |
|---|---|
| Which sections you can choose | Show In Appointments Screen on the department section |
| Which procedures are offered | The procedure's Department Sections grid: names the section, or is empty |
| Which weeks you can page to | From/To dates on the booking settings Details grid |
| The height of a grid row | Slot Duration In Minutes, the shortest one if the rows differ. 30 minutes when blank |
| Working hours and rest days | The attendance shift named on the booking settings. 06:00–24:00 when the section has no booking settings |
| Time before now | The current time. The past is never bookable |
| Which crews are listed | Committed crews, by their Department Section and Procedures grid |
| Each crew's colour | Color Code on the crew, or an automatic colour |
| Which appointments are drawn | Committed, not cancelled appointments of the ticked crews that match the filters, up to 200 for the period on screen |
| The book the appointment is numbered in | Appointment Books And Terms Per Section |
If the calendar is not offering what you expect, go through this table row by row.