
Installing Nama POS on a New Register and Connecting It to the Server
Nama POS is a desktop application that runs right on the cash register and keeps its own local database, so it can keep selling even when the connection to the central server drops. Because of that design, setting up a brand-new register is a little different from opening a web page — there is a local database to prepare and a one-time connection to configure. This page walks through the whole journey: from a bare Windows machine to a register that is downloading items, users and prices from the server and is ready to ring up its first sale.
This is a one-time setup
You do this once per register. Day-to-day use — signing in, selling, shifts — starts on the Getting Started page. Configuring the register's behaviour on the server (payment methods, security profiles, screen layout) is a separate topic.
Before you start
Have these ready before you touch the new machine:
- A Windows machine to act as the register.
- The Nama ERP server reachable over the network — its address and port.
- A server login (user name and password) that POS may use to talk to the server, or an API key instead.
- The register already defined on the server, with a code. The setup connects by that code and the server checks it exists, so the register record must be created first.
Step 1 — Install SQL Server
Each register stores its sales locally in SQL Server, so the first thing to install on the machine is SQL Server itself.
Which edition? Nama POS works with SQL Server Express, which is free — fine for a register with a modest catalogue. For customers with a large number of items and customers we recommend Standard edition, which removes Express's size and memory limits and holds up better under load. Developer edition is also free and full-featured, but it is licensed for testing and development only — never run a production register on it.
Two things matter during installation:
- Choose Mixed Mode authentication, so that both Windows authentication and SQL Server authentication are enabled. POS signs in to the database with a SQL Server login, so SQL authentication has to be on.
- Note the
sapassword you set. (Alternatively, you can create a dedicated SQL login later and grant it access to the POS database — that is the tidier choice in production.)
After the installer finishes, open SQL Server Configuration Manager and enable the TCP/IP protocol for the instance, then restart the SQL Server service — exactly as you would when installing the Nama ERP server. Without TCP/IP enabled, POS cannot reach the database. The default SQL Server port is 1433.
Step 2 — Create the empty POS database
Open SQL Server Management Studio and create an empty database for the register, then apply the same isolation settings a Nama database uses. These settings (read-committed snapshot and snapshot isolation) let readers and writers work without blocking each other, which keeps the register responsive. Replace DB_NAME with the name you want (for example pos101):
-- Create the database
create database DB_NAME;
GO

-- Set the isolation level
USE [master];
DECLARE @kill varchar(8000) = '';
SELECT @kill = @kill + 'kill ' + CONVERT(varchar(5), session_id) + ';'
FROM sys.dm_exec_sessions
WHERE database_id  = db_id('DB_NAME')
EXEC(@kill);
ALTER DATABASE DB_NAME SET READ_COMMITTED_SNAPSHOT ON;
ALTER DATABASE DB_NAME SET ALLOW_SNAPSHOT_ISOLATION ON;
ALTER DATABASE DB_NAME SET MEMORY_OPTIMIZED_ELEVATE_TO_SNAPSHOT ON;
Leave the database empty — POS will create its own tables and fill them on first connection.
Step 3 — Download and run the installer
Download the POS installer from:
https://namasoft.com/bin/update-pos.exe
Run it. The installer downloads Nama POS and unpacks it into its folder. When it is done, run pos-launcher.exe from that folder — this is what starts the register from now on.
On that first launch the launcher quietly makes sure everything POS needs is present, downloading whatever is missing:
- It looks for a suitable Java runtime (JDK 21 or newer); if none is found, it downloads and installs one.
- It looks for the JavaFX library that the interface needs; if it is missing, it downloads it.
- It makes sure the POS application itself is present, downloading the latest version if needed.
Then it starts the Nama POS desktop application.
Keep the installer for later
update-pos.exe is also the updater. Keep it next to the register — running it again later upgrades POS to the newest release.
Step 4 — Fill in the settings dialog
The very first time POS starts it has no idea where its database or its server are, so before anything else it opens the Settings dialog. Everything POS needs to connect lives here, in two groups of fields.
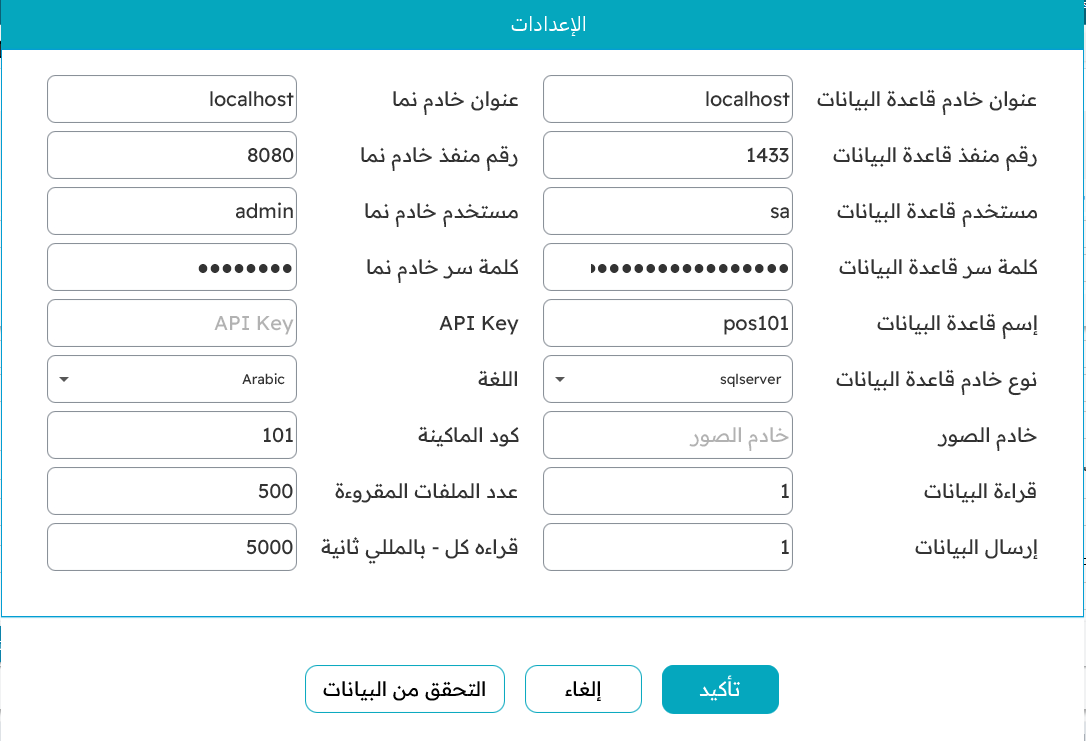
The database group describes the local SQL Server you set up in steps 1 and 2:
- Database server address —
localhostwhen SQL Server is on the same machine as the register. - Database port —
1433by default. - Database user —
sa, or the dedicated login you created. - Database password — that login's password.
- Database name — the database you created in step 2 (for example
pos101). - Database server type —
sqlserver. - Image server — optional; leave it empty unless you serve item images from a separate address.
- Read data / Send data — keep these on (
1) so the register both pulls fresh data down and pushes its documents up.
The Nama server group describes the central ERP the register syncs with:
- Nama server address and Nama server port — where the Nama ERP server answers (for example port
8080). You can also enter a fullhttp://…/https://…address. - Nama server user and Nama server password — the server login POS uses. Instead of a user and password you may supply an API key, which keeps working even after the user's password changes.
- Language — the register's interface language.
- Machine code — the register's code as defined on the server. This is the link between this machine and its register record.
- Number of records read and Read every (ms) — how many records each sync pulls and how often. The defaults are fine for most setups.
When the fields are filled, press Check Data. POS tests the database connection, signs in to the server, and confirms the register code exists — anything wrong is flagged on the offending field so you can correct it. Once it checks out, press Confirm.
Step 5 — Restart, and the first sync
Confirming saves your settings and closes Nama POS. That is expected. Start the register again (run pos-launcher.exe).
This second time, POS connects to the server and downloads the foundation data into its local database — users, the register itself, branches, currencies, items, prices and configuration. On a fresh register with a large catalogue this first sync can take a little while; it only happens once. When it finishes, the login screen appears and the register is ready.
From here, continue with Getting Started at the Register to sign in and make the first sale.
The register must exist on the server first
If the Check Data step reports the register code as invalid, it almost always means the register has not been defined on the server yet, or the code does not match. Create or correct the register on the server, then run Check Data again.