
Units of Measure
Nama holds every item's stock in one single unit and lets each document speak a different one, so a distributor can buy a product by the carton, sell it by the piece and report on it by the litre without anyone doing the arithmetic by hand.
That sentence hides a decision that is easy to get wrong and painful to undo. Whichever unit you nominate as the item's base unit becomes the unit that balances, costs, stock ages, reservations and every report are kept in, forever. Everything else — cartons, pallets, dozens, kilos — is a translation layer sitting on top of it.
This page walks through the four screens that make that translation work, and then builds the classic "buy by the carton, sell by the piece" setup end to end.
The Four Screens, and What Each One Is For
| Screen | Menu | What it holds |
|---|---|---|
| UOM | Inventory → Settings → UOM | One unit — piece, carton, kilogram — and how it rounds and behaves |
| UOM Unit Group | Inventory → Settings → UOM Unit Group | A named family of units with one set of conversion rates shared by every item that uses it |
| Unit Conversions | Inventory → Settings → Unit Conversions | Every conversion rate in the system, in one list — almost all of it written by the system itself |
| Standard Measures | Inventory → Master Files → Standard Measures | A permitted list of physical sizes, for items sold by length, area or volume |
A fifth screen, Calculation Formula (Inventory → Settings → Calculation Formula), belongs to the same family but answers a different question — it is for services whose quantity is worked out from a measurement rather than counted. It has its own section near the end.
Defining a Unit
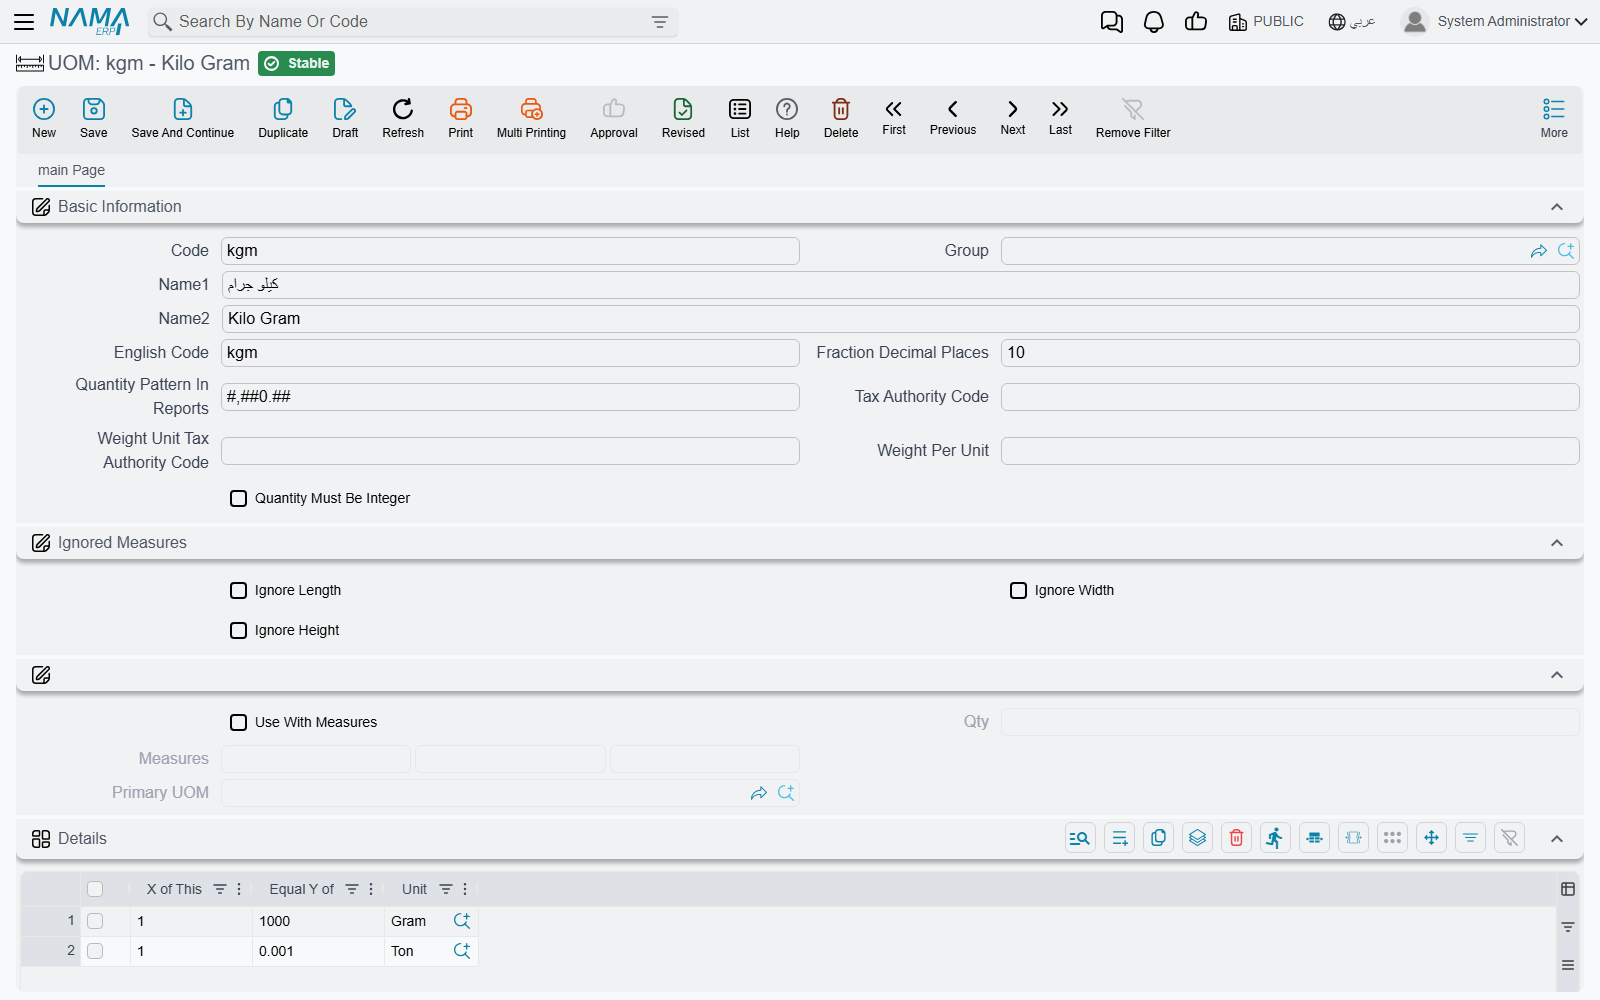
The UOM screen is deliberately small. A unit is a code, an Arabic and an English name, and a handful of settings that decide how the system treats numbers expressed in it.
Fraction Decimal Places is the one that matters most, and it is not cosmetic. Every conversion the system performs is rounded to the decimal places of the unit it converts into. A new unit starts at 2. If you set a piece to 0 decimal places and someone enters 1.3 cartons of 24, the 31.2 pieces they meant become 31. Give the base unit enough decimals to represent whatever fractions of it can legitimately occur.
Quantity Must Be Integer goes further and refuses the entry outright: a document line whose quantity is expressed in this unit and carries any fraction at all cannot be saved. It is the right switch for a unit like engine or vehicle, where half of one is not a real thing.
The rest of the main block is smaller in scope:
| Field | What it does |
|---|---|
| Quantity Pattern In Reports | Overrides the system-wide number format for quantities printed in this unit |
| Tax Authority Code and Weight Unit Tax Authority Code | The codes the tax authority expects for this unit, for electronic invoicing |
| Weight Per Unit | Multiplied by the line quantity to give the line's weight — how a document knows an order weighs 1.4 tonnes |
Conversions Written on the Unit Itself
Below that sits the Details grid, and this is the simplest of the three places a conversion rate can live. Each row reads left to right as a sentence: X of This 1, Equal Y of 12, Unit Piece — one of this unit equals twelve pieces.
A rate defined here is standard: it applies to every item in the database that uses both units. That is exactly right for a dozen (always twelve of something countable) and exactly wrong for a carton, which holds twenty-four of one product and six of another. Reserve this grid for units whose relationship is a fact about the world rather than a fact about a particular product.
Saving the unit writes a conversion record for you
When you save a UOM that has rows in its Details grid, the system creates or refreshes a matching record on the Unit Conversions screen, named after the unit's code with Conversions appended and marked Created By System. You never have to create it and you should not edit it — the section on the Unit Conversions screen below explains why.
The Ignored Measures Block
Ignore Length, Ignore Width and Ignore Height exist for items whose quantity is derived from physical measurements. When a line carries measurements, the entered count is multiplied by each measurement the unit does not ignore. A metre ignores width and height, so a line of 3 pieces of 5 metres is 15 metres. A square metre ignores only height, so 3 pieces of 2 × 1.5 is 9. Leave all three off and a unit that is never used with measurements is unaffected.
Units That Carry Their Own Measurements
The unnamed block holding Use With Measures, Qty, Measures and Primary UOM is a shortcut for a standard, pre-cut format. A glass merchant sells cut-to-size glass by the square metre, but also sells a stock sheet that is always 1.22 × 2.44 metres. Rather than making the salesman type those numbers on every line, define a unit called Sheet, switch on Use With Measures, set Qty to 1, fill Measures with the length, width and height (all three are required once the switch is on), and set Primary UOM to the square metre.
Now, when Sheet is chosen as the second unit on a document line, the system fills in the measurements from the unit, sets the line's main unit to the square metre, and computes the resulting area itself. The salesman types "4 sheets" and the document holds 11.91 square metres.
Unit Groups: Defining the Rates Once for a Whole Family
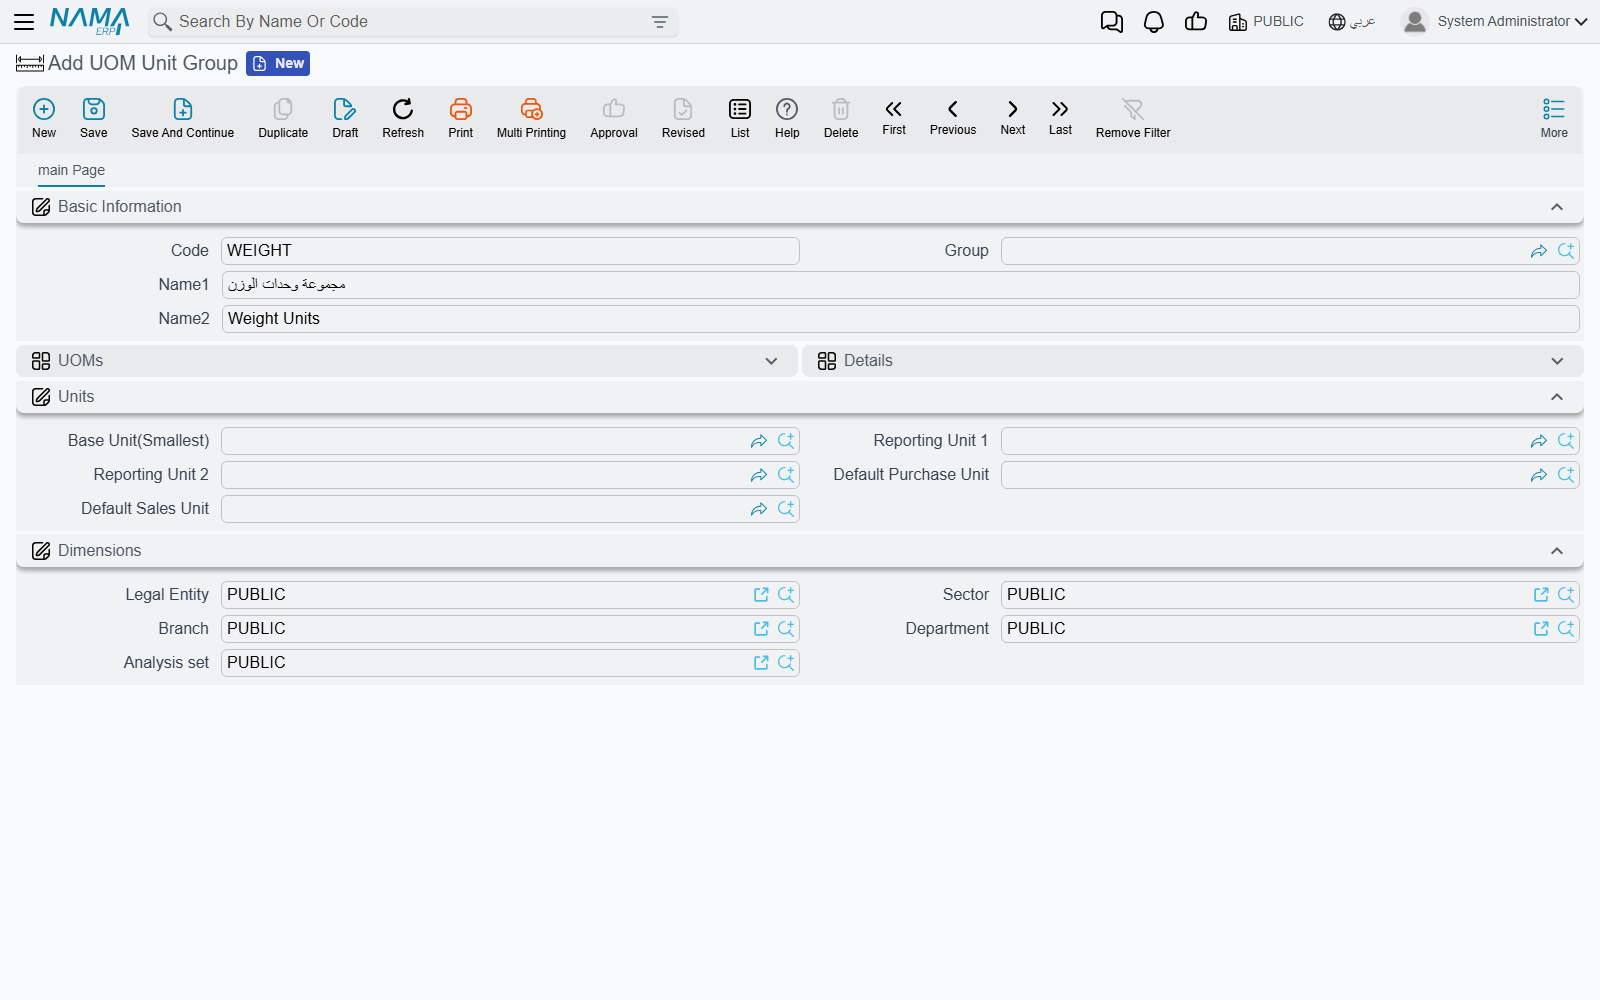
For a wholesaler with three thousand items, defining "1 carton = 24 pieces" three thousand times is not a plan. The UOM Unit Group screen is the answer: a named family of units, the conversion rates between them, and a set of sensible defaults, all of which any item can adopt in a single field.
The screen has three parts, and they must be filled in that order:
- The UOMs grid lists which units belong to the group. Nothing else on the screen may mention a unit that is not listed here — try it and the save fails with Invalid UOM, it was not mentioned in units grid.
- The Details grid holds the rates, one row per pair: X of 1, Unit Carton, Equal Y of 24, Unit Piece.
- The Units block names the group's defaults — Base Unit(Smallest), Reporting Unit 1, Reporting Unit 2, Default Purchase Unit and Default Sales Unit.
Those defaults are the reason the screen saves so much work. When you pick a group on an item, the item takes all five of them from the group in one move, and every unit in the group's UOMs grid is added to the item's own units grid automatically. A group therefore describes a packaging convention — "24-bottle cartons on 50-carton pallets" — that dozens of items can share.
Like a UOM, saving a group writes its own system-generated record on the Unit Conversions screen.
A group is a family, not a hierarchy
Grouping units together does not chain their rates. If the group knows 1 carton = 24 pieces and 1 pallet = 50 cartons, the system still cannot work out how many pieces are on a pallet — it looks for a rate between the two units it actually needs and gives up if there is no row for that exact pair. Add the pallet-to-piece row explicitly. This applies everywhere a rate is defined, not only in groups.
Buying by the Carton and Selling by the Piece
Here is the whole setup, worked through for a soft-drinks distributor who buys 24-bottle cartons from the factory, stores bottles, and sells bottles over the counter and cartons to shops.
Step 1 — Create the units
On the UOM screen create Piece and Carton. Give Piece 0 decimal places if you never sell part of a bottle, and switch on Quantity Must Be Integer so a fractional bottle cannot be entered by accident. Leave Carton at 2 decimal places — you will want it to be able to express "50 bottles = 2.08 cartons" when a report converts the other way. Do not put anything in either unit's Details grid: a carton is 24 bottles for this product, not for every product in the catalogue.
Step 2 — Choose the base unit
The base unit is the bottle. This is a decision about how you want the warehouse counted, not about how you buy or sell, and the test is simple: the base unit should be the smallest unit you will ever need to move a whole number of. If you will ever issue a single bottle, the base has to be the bottle. Everything coarser can still be entered on documents — the system converts it.
Step 3 — Fill the Units tab on the item card
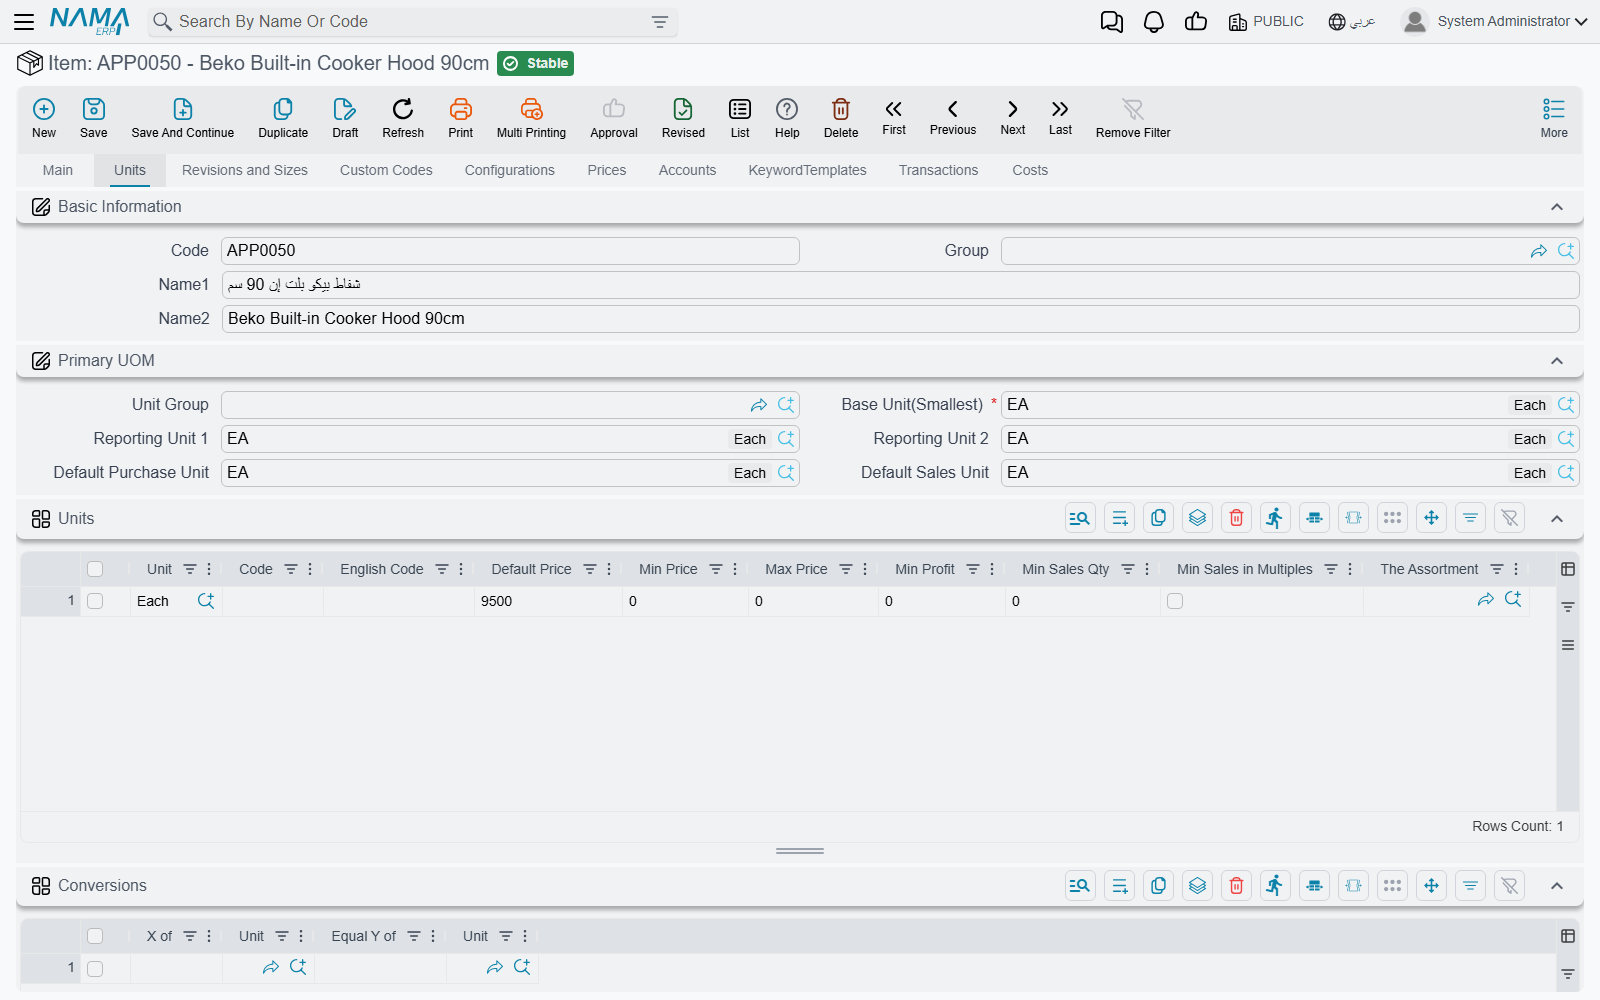
Open the item and go to its Units tab. The Primary UOM block is the one to fill:
| Field | Value | Why |
|---|---|---|
| Unit Group | (leave empty for now) | Only needed if a family of items shares the same packaging |
| Base Unit(Smallest) | Piece | The unit stock, cost and reports are kept in |
| Default Purchase Unit | Carton | The unit purchase and receipt documents open with |
| Default Sales Unit | Piece | The unit sales and issue documents open with |
| Reporting Unit 1 / 2 | (optional) | Extra units offered to users and reports |
Notice what happens as you type. Choosing the Base Unit(Smallest) copies it into any of the other four fields that are still empty, and adds it as a row in the Units grid below. Choosing the Carton as Default Purchase Unit adds a Carton row to the same grid. The grid is not something you normally fill by hand — it fills itself as you name units above it.
Step 4 — State the rate
Still on the Units tab, the Conversions grid under the units grid is where the item's own rate goes. One row:
| X of | Unit | Equal Y of | Unit |
|---|---|---|---|
| 1 | Carton | 24 | Piece |
That is the entire conversion. Read it as the sentence it is: one carton equals twenty-four pieces.
Every unit must reach the base unit directly
Before saving, the system checks that each unit in the units grid has a rate connecting it to the base unit — as a standard rate on the units themselves, as a rate in the item's unit group, or as a row in this grid. If one does not, the save fails with Could not find conversion between base unit ({0}) and unit ({1}).
The word to notice is directly. If you later add a Pallet, the row you need is 1 Pallet = 1200 Piece, not 1 Pallet = 50 Carton. The system does not multiply two rates together to get a third.
Step 5 — Save, and see what changed
Saving the item does three things worth knowing about:
- It computes, for every row in the units grid, that unit's rate to the base unit. This derived rate is what the screens use to convert quantities as you type, and it is what the system compares against if you ever edit the rate later.
- It creates a system-generated Unit Conversions record for the item, named after the item's code.
- It refuses the save if you removed a unit from the grid that already has transactions behind it — The uom {0} can not be removed from the item {1} because the item has {2} transactions for this unit. There is no configuration switch for that one.
Step 6 — Use it
Now the setup earns its keep, because the unit each document opens with is chosen for you:
- A purchase or receipt document — and a stock transfer, and the assembly document — defaults its lines to the Default Purchase Unit. Type 10 and the document reads 10 cartons.
- An issue document — a sales invoice, a stock issue — defaults to the Default Sales Unit. Type 50 and it reads 50 pieces.
- Anything else falls back to the Base Unit(Smallest).
Whatever the user typed, the line also stores the quantity converted into the base unit, and that base figure is what stock balances, costing, stock ages and reservations all work from. Receiving 10 cartons puts 240 bottles into the warehouse. Selling 50 bottles takes out 50. Nobody converts anything.
A customer or supplier can override the default
Customer and Supplier each carry a Default UOM field, offering Base Unit(Smallest), Reporting Unit 1, Reporting Unit 2, Default Sales Unit and Default Purchase Unit. Where it is set it beats the document's own rule, so a supermarket chain that always orders in cartons gets cartons on its sales invoices while walk-in customers get pieces. The value is looked up on the party first, then on its class, and for a customer, then on its paying customer. A Warehouse carries the same idea in its Default Sales UOM and Default Purchase UOM fields, used when neither party sets one.
What Else the Units Grid Row Carries
Each row in the item's Units grid is more than a name. Alongside the Unit and its Code and English Code it holds selling rules that apply only when the line is written in that unit:
| Column | What it does |
|---|---|
| Default Price, Min Price, Max Price, Min Profit | Price boundaries for this unit |
| Min Sales Qty | The smallest quantity that may be sold in this unit |
| Min Sales in Multiples | Makes the minimum a step rather than a floor |
| The Assortment | Links the unit to a pre-packed mix — see Item Classification Files |
Min Sales Qty works in two ways at once, and both are worth knowing. If the document term switches on Prevent Sales If Quantity Less Than UOM Min Quantity, a sales line below the minimum cannot be saved at all. Independently of that, the quantity a line is charged for is lifted to the minimum: order 3 pieces where the minimum is 10 and you are billed for 10, while the warehouse still ships 3. Turn on Min Sales in Multiples and the charged quantity is rounded up to the next whole multiple instead — order 23 with a minimum of 10 and you are billed for 30.
Because these live per unit, the same item can carry a minimum of 1 in cartons and 12 in pieces.
Where the Conversion Rate Actually Lives
By now three different places can hold the rate between two units, and a fourth exists for batches. When a document needs to convert, the system tries them in a fixed order and stops at the first hit:
- Lot conversions — a rate defined for one specific item and one specific batch. Only consulted when the line names a lot.
- The item's own conversions — the grid you filled on the Units tab.
- The unit group's conversions — from the group named in the item's unit block.
- Standard conversions — the Details grids of the two units themselves.
So the narrow definition always wins. A group can say "1 carton = 24 pieces" for the whole range while one oversized product overrides it with 12 on its own card, and one damaged batch of that product overrides it again with 11.
Two details decide whether a rate is found at all. A rate is bidirectional — a row saying 1 carton = 24 pieces converts pieces to cartons just as happily — but it must name the exact pair of units being converted, because the system never chains one rate through another. And the answer is rounded to the decimal places of the unit being converted into.
Rates can be narrowed by colour, size or revision
If Use Color / Size / Revision in Unit Conversions is switched on in supply chain configuration, the conversion grids on all of these screens grow extra columns, and a rate that names a colour, size or revision applies only to lines carrying that value. A row with the field left blank still applies to everything. This is how one item can have a lighter carton for its small size than for its large one. The switches are described on Item Properties Configuration.
The Unit Conversions Screen
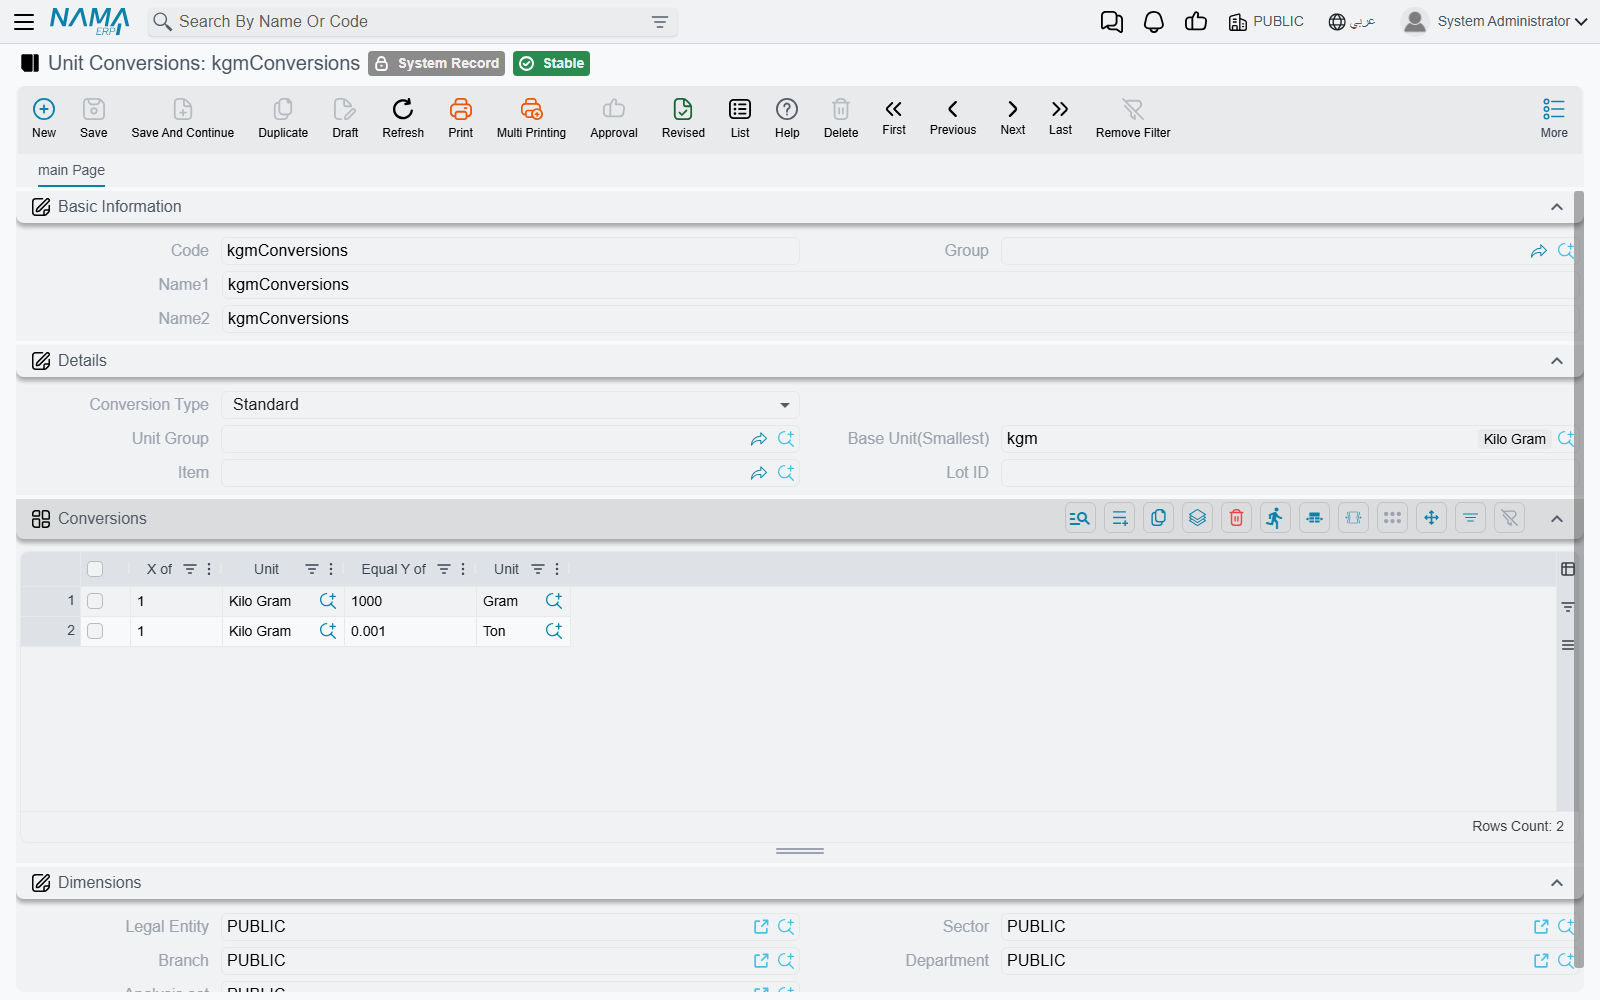
At this point the Unit Conversions screen (Inventory → Settings → Unit Conversions) makes sense. It is the single list into which every rate defined anywhere else is collected — one record per unit, per group, per item's primary units, per item's secondary units — each stamped Conversion Type Standard, Group, Item Primary or Item Secondary, carrying a Remarks of Created By System, and named after the code of whatever created it.
For support work that makes it the fastest screen in the module. Rather than opening a dozen item cards to find out why a quantity converted oddly, filter this list by item or by unit and read every rate that could have applied, in one place.
You can look, but you can mostly not touch
Saving a record here whose Conversion Type is anything other than Lot is refused outright: Could not modify System generated conversions. Edit the UOM, the group, or the item — the record here is rewritten from that source each time it is saved. Deleting the source deletes the conversion record with it.
Lot is the exception, and it is the one thing this screen exists to let you create. A new record starts as Lot, and you fill in the Item, the Lot ID and the rows in the Conversions grid. It is for the case where a rate genuinely varies per batch: a paper mill whose reels are nominally 500 kilograms but where this particular delivery averaged 487.
Why the Base Unit Is Hard to Change Afterwards
Every quantity ever recorded against an item is stored converted into that item's base unit. Change the base unit and those stored figures do not change with it, so the entire history silently changes meaning: 240 recorded bottles become 240 cartons.
Nama therefore refuses. Once the item has any transaction at all, changing the Base Unit(Smallest) fails with The base unit can not be changed from X to Y in the item Z because the item has N transactions.
The same protection covers the rate. If a unit's rate to the base changes and there are transactions expressed in that unit, the save fails with The rate of the unit {0} was changed from {1} to {2} in the item {3}, and there are {4} transactions for this unit and item — with a second, separate message if the unit was used in production orders or bills of material.
Both can be lifted, and both belong to the emergency-correction category rather than to normal work:
- Allow Update Base UOM if Item has transactions
- Allow Update Rate To Base if Item has transactions
They are described on Items and Master Data Configuration. Switching either on does not fix the stored history — it simply stops the system arguing. If a base unit really is wrong, the honest fix is usually a new item.
Give new items a base unit without thinking about it
Supply chain configuration has a Default Units block holding a Unit Group and a Base Unit(Smallest). A brand-new item card opens with those already filled in — the group's units listed in the units grid, and the base unit copied into the purchase, sales and both reporting unit fields — so the person creating the item only has to change what is genuinely different. The block is described on Pricing and Price Lists Configuration.
An Item Section carries its own primary and secondary unit blocks too, and a new item inherits them the moment you pick the section. Between the two, most items should arrive on screen with their units already correct — which is the best defence there is against someone choosing a base unit casually.
The Second Unit
Some items genuinely need two measures that are not convertible into each other. Meat is bought and sold by weight but counted in pieces, and 10 kilograms is not "some number of" chickens — it depends on the chickens.
Switch on Has Second Unit on the item's Units tab and a whole second block appears — Secondary Unit — with its own Unit Group, Base Unit(Smallest), purchase, sales and reporting units, its own units grid and its own conversions grid. Document lines then capture two quantities per line, each converted into its own base independently. Second UOM Required forces the second quantity to be entered rather than left blank.
The two sides never talk to each other. Nothing converts kilograms into pieces, which is exactly the point.
Units Whose Quantity Is a Measurement
Everything so far assumes you count things. Some businesses do not: a carpenter sells cut boards by the square metre, an aluminium fabricator sells frames by the linear metre, a glass merchant prices by area and cuts to order.
For those, switch on Has Measures on the item's main tab and set Measures Type to Single Dimension, Two Dimensions or Three Dimensions. Document lines for the item then offer length, width and height boxes, and the line's own quantity field becomes read-only — the system computes it. By default it multiplies the entered count by each measurement that the line's unit does not ignore, which is where the Ignore Length / Width / Height switches earn their keep.
Calculation Formula
Sometimes plain multiplication is not the rule. A glazier charges for the glass area plus a fixed edge allowance; a workshop bills a cut at length plus width rather than length times width. The Calculation Formula screen (Inventory → Settings → Calculation Formula) is where you write the rule instead.
The screen holds a code, names, and one field: Calculation Formula. You write it using the letters L, W and H for the line's length, width and height, with the usual arithmetic operators and brackets — l*w, (l+w)*2, l*w*h. Case does not matter, and multiplication may be left implicit: lw is read as l*w. Nama parses what you typed into the second field, Formula, and test-runs it when you save; if it does not evaluate, the save fails with The formula is not correct.
Attach it to an item by switching on has Calculation Formula on the item's main tab and picking the formula in Calculation Formula. The line quantity is then the entered count multiplied by whatever the formula returns for that line's measurements. Any measurement left blank or zero counts as 1, so a two-dimensional formula behaves sensibly on a line that has no height.
Formulas are only for service items with measurements
The two fields stay disabled unless the item's type is Service and Has Measures is on, and if either becomes untrue the system clears them again. Saving an item that breaks the rule fails with Calculation Formula must be used with Service Items with dimensions only. An assembly item may not carry one at all. The item's Configurations profile must also have its measures block enabled, or the save fails pointing at the profile.
This is why the mechanism reads oddly at first: it is not for stocked goods sold by area, it is for the labour and services priced off a measurement — cutting, edging, polishing, installation — that sit on the same document as the material. Cutting and related work are covered in Specialised Scenarios.
Standard Measures
The last screen deals with a different problem. A factory that cuts to any size still buys its raw material in a fixed catalogue of formats, and an operator who types 1.20 × 2.40 where the mill only ever ships 1.22 × 2.44 has quietly created a size that does not exist.
Standard Measures (Inventory → Master Files → Standard Measures) is a named list of permitted formats. Give it a Measures Type — Single Dimension, Two Dimensions or Three Dimensions — and fill the Details grid with one row per format, each giving L, W and H. Duplicate rows are rejected. The item then points at the list through the Standard Measures field on its main tab, and the item's Measures Type must match the list's, or the save fails.
Once attached, a purchase invoice line for that item must carry measurements matching one of the rows — length and width must both match, and for a three-dimensional list the height as well — or the line is rejected with These Measures are not Standard Measures. It is a purchasing control: it stops a receiving clerk inventing a sheet size that the supplier never sold you, and it keeps the stock file free of near-duplicate formats that nobody can pick from later.
Messages you may see
These are the refusals that belong to units themselves. The item card's own checks — sizes, colours, revisions, batches — are on Understanding Inventory Items.
| Message | Why | What to do |
|---|---|---|
| {0} creation failed — «تعذر إنشاء {0}» | Saving a unit, a unit group or an item's units tab also rewrites the hidden Unit Conversions record behind it, and that rewrite could not start — usually because someone else is holding the same conversion record open. | Save again after a moment. If it repeats, open the Unit Conversions screen and check whether the record for this unit, group or item is locked or in a draft state. |
| UOM {0} in line number {1} must match base unit {2} — «الوحدة {0} في السطر {1} يجب أن تكون الوحدة الأساسية {2}» | A conversion line on the item card converts to some unit other than the base unit of the item's primary unit. Every rate on the item is expressed against the base unit and nothing else. | Set the line's To UOM to the base unit named in the message, and express the rate against it. |
| Could not find conversion between base unit ({0}) and unit ({1}) — «لم يمكن العثور علي تحويل بين الوحدة الأساسية ({0}) و الوحدة ({1})» | A unit was added to the item's units grid, but nothing tells the system how many of it make a base unit — neither the unit group, nor the unit's own conversions, nor a conversion line on the item. | Give the unit a rate: add a conversion line on the item, or put both units in a unit group that states the rate, or fill the rate on the unit itself. |
| {0} is not listed in the units grid — «{0} غير مدرجة بقائمة الوحدات» | A unit was chosen in one of the item's single-unit fields — the purchase unit, the sales unit and the like — that is not one of the rows in the item's units grid. | Add the unit to the units grid with its rate first, then select it in the field. |
| The uom {0} can not be removed from the item {1} because the item has {2} transactions for this unit — «لا يمكن تعديل الوحدة {0} للصنف {1} لان الصنف تم عليه {2} حركات لهذه الوحدة» | A unit row was deleted from the item's units grid after documents were already written in that unit; removing it would leave those quantities untranslatable. There is no configuration switch that lifts this one. | Put the row back. If the unit must stop being used, leave it on the item and stop selecting it on new documents. |
| The uom {0} can not be removed from the item {1} because the item and unit were used {2} times in production orders and BOMs — «لا يمكن تعديل الوحدة {0} للصنف {1} لان الصنف و الوحدة تم عليهم {2} حركات في أوامر الإنتاج و مكونات المنتج» | The same deletion, counted against production orders and bills of material instead of stock documents. Both messages can appear together for one unit. | Put the row back, or amend the production orders and bills of material that use it first. |
| The rate of the unit {0} was changed from {1} to {2} in the item {3}, and there are {4} transactions for this unit and item — «معامل التحويل للوحدة {0} تم تغييره من {1} إلى {2} للصنف {3}،وهناك {4} حركات تمت على نفس الصنف والوحدة» | A unit's rate to the base was edited while documents already exist expressed in that unit — their base-unit quantities would silently change. A second, separately worded message counts the same usage in production orders and bills of material. | Add a new unit for the new rate and use that on future documents, or have the supply chain option Allow Update Rate To Base In Trans enabled if the old figures really are wrong and should move. |
Where Units Show Up Next
Units reach further than the item card. Price list lines are priced per unit, and the sales price list can expand one line into one line per unit of the item with Spread Selected Line Data — Pricing, Offers and Coupons covers that. Supply chain configuration decides whether a document's total-quantity figure is shown in the purchase unit, the sales unit or the base unit, and whether a price list price is used only when the line's unit matches the price list line's unit. And the item's classification files carry the assortment that a unit row can point at — Item Classification Files.
For the item card itself and everything that is not a unit, start at Understanding Inventory Items.